
A simple step by step guide for 4 intermediate fuse bead projects.
Christmas 2020. It was one for the books, eh!?
Between the quarantining just to celebrate with a modicum of “normalacy” and the regular hum of holiday preparations… it was, as the whole of 2020 has been, unique.
Silver lining for our family: because events were canceled and we quarantined before Christmas, there was plenty of time to work on our home-made fuse bead gifts (check out this article for our complete list of info)…
Some of these projects were a little more involved than my fuse bead experience as an 8 year old had prepared me for. If you’re in the same boat and worried about the complexity of these projects, don’t worry, I’ve got you covered.
Below is a lightweight breakdown of how we completed some of the more complicated projects (i.e. anything that wasn’t a fridge magnet or bag charm)… but if you need more clarification, don’t hesitate to contact me!

First, a note about the basics: Fridge Magnets, Ornaments and Charms
These are pretty straightforward. Find a pattern, follow the pattern, fuse, repeat. Then hot glue the magnet, or attach the jump rings as needed. TIP: Pay attention to the pegboard patterning when you decide on a design… hexagonal, round, square peg boards all result in different shapes. For example, the top and left ornaments were made on a square pegboard, but the bottom right was done on a hexagonal one… just something to be aware of before you jump in.
For all of the following projects you will need your fuse bead basics (which also come with directions for how to fuse):
- 5mm plastic fuse beads (after all these projects we would definitely recommend using Perler brand fuse beads)
- Peg boards (of various shapes and sizes, depending on what you are planning to create)
- Ironing paper or film (this usually comes with the boards if bought in a kit)
- Tweezers (optional, but totally worth it, especially if your adult size fingers are participating and you don’t want to spend your time replacing tipped over beads on the peg board)
- An iron (a regular one will do, but if you don’t have one, or want a smaller version, they also make {these small craft irons} that are easier to maneuver)
These supplies can all be found at any craft store and many on Amazon, though not always competitively priced. I found the best price and selection at Michael’s… which conveniently *dangerously* happens to be down the street from our home. We first purchased {this kit} and {these peg boards} from Amazon (read my general review here). If doing it all again, I would begin with {this kit} and {this bucket of beads} instead.

Next… Molded Bracelets
These little guys were tricky, since we worked off of a picture, rather than a set of directions. I had to break this down and take my best guess. The molding part is the simple bit… just takes a form and some masking tape. But the closing off of the opening… requires a few specific supplies and jewelry know-how. So I’ll share what I did, but I would love any more suggestions in the comments, especially from you veteran jewelry makers!
Supplies
In addition to the fuse bead supplies, you will need:
- A ruler
- Clothes pins
- Stretchy jewelry thread of any color {we used this clear one}
- Sewing needle
- Jewelry glue {like this one}
Process
- Measure the size wrist you’re crafting the bracelet for, this is your bracelet length.
- Using a square or hexagonal pegboard, create a straight line 3 or 4 beads wide to your predetermined length. We used a square pegboard and lined the beads up diagonally to get our stripes and the zig-zag heart design.
- Iron this first side lightly (this will become the underside of the bracelet), remove paper before completely cooling, flip and iron the second side (which becomes the top side), as melty/fused as you want the beads to be.
- While still hot, roll the ironing paper/film into a tube so that the ends of the bracelet meet. Clip the edges of the film with the clothes pin to secure it in a roll. Let the bracelet cool in this shape.
- As just one layer of fuse beads, the bracelet will be fairly flexible even when cool, so you will need to attach the open ends together with stretchy jewelry string (we used this kind). Thread the ends together twice using a criss cross pattern. It also helps to pre-stretch the string out so it doesn’t get loose as the wearer wears it.
- tie in a surgeons knot (link here), trim ends and secure with a dot of E6000 glue. You want this specific type of glue, because it will stay put on plastic stretchy string and does not get brittle and break off with movement (unlike super glue).
- Let cure and you’re ready to go!
3-D fuse bead boxes….

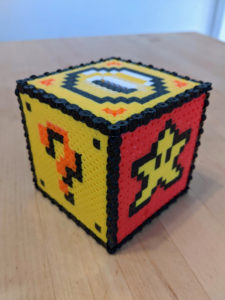
These 3D Boxes are possibly my favorite fuse bead make… they’re just… cool.
In just this one craft, the all-purpose functionality of a box and the whimsy of fuse bead crafts are realized. And it is completely customizable! You determine the size, theme, opening style, etc. Your imagination is the limit. We did a lidded Rubik’s cube box and a vintage Super Mario Bros. coin bank.
The challenge for this make is creating/ finding a pattern that plans out the joints… i.e. where the beads to join together at the edges…. and following it accurately so the joints puzzle together. Luckily, there are more than enough pre-made patterns out there like {this Rubik’s Cube} on Pinterest… that will help you determine how the edges should be constructed… or you can make your own with one of those old school flattened out 3D box diagrams from geometry class. You remember what I’m talking about, right? The thing that looked like hopscotch outline?
Materials
All you need in addition to your fuse bead basics is an optional hot glue gun, if you want to create a separate lid. We used it to create the inner lip on the lid of our Rubik’s cube… but the rest of the pieces join together like a puzzle with pure fuse bead ingenuity… 😉 and the Mario coin box is held together with just that.
Process (General box making)
- Determine which type of box you are creating (open, lidded, etc.), and what you want each of your 6 sides to be.
- If you can find a pattern, awesome. If not, use the Rubik’s cube link above to plan our your joints and design your panels with these patterns in mind.
- If you are making a closed lid box, the top and bottom pieces will be identical. We made a slit in the middle of our coin for our Mario coin box to allow coins in. For the Rubik’s cube box, we decided to make a completely separate lid for added functionality.
Process (Rubik’s Cube Lid)
- Before ironing each of the four sides, remove the top edge of black border beads.
- Determine which side and pattern will be used for the lid, Create the colored Rubik’s cube design on your pegboard.
- Rather than following the black puzzle-like patterned border, place a solid black border around the design. This will ensure that your lid can sit atop the entire box. Iron this pannel.
- Create the underside/lip of the box by making another square, 1x row smaller on all sides. So, if you have a 15×15 row box, this underside should be 13×13. We choose to do this by replicating the Rubik’s cube design, and simply removing the border, but you can make the underside whatever you want. As long as the sizing is correct, it will function. As you can see, we also choose to add initials for further personalization. So customize away!
- Using your hot glue gun, glue the underside and top side together. This creates a “lip” which keeps the lid from sliding off the top of the box. Let cool and you’re good to go!

Wine charms
If you’re making your own patterns, the trick here is to keep it small. Like, smaller than you think. More than 5 beads high or wide and its too big. This is tricky to find, unless you go with the mini-sized Perler beads. We have not personally tried the mini beads out yet, but they seem like a fantastic idea. (Have you? What did you think? Let me know in the comments!)
Materials
Besides basic fuse bead supplies, you’ll need:
- Jump rings (7mm or larger) {like these}
- Craft wire (18-24 gauge) {we used this}
- A needle nose pliers
- A circular mold to wrap the wire around (I used a glue stick).
Process
- Make the charm, allow to cool, and attach the jump ring.
- Wrap craft wire tightly around circular mold (i.e. a glue stick or whatever you have on hand), then release. Use a wire cutter to snip the wire at a length that wraps the mold two full times. TIP: this step is easiest done in bulk. For example, if you’re making a set of 8 wine charms, wrap enough wire (16x around the mold), and make all the cuts at the same time.
- Thread the wire into the jump ring of one or two charms, and using a needle nose pliers, curl the ends of the craft wire to finish it off and keep the charms from sliding off.
- You have a wine charm! The easiest way to put them a stem is by opening the coils slightly and sliding it over the stem of the glass. You can, of course, unwrap the craft wire coil, but this leaves you with a bent looking charm, and why do that after you just coiled them so nicely?
- Drink a large glass of whatever’s your jam and enjoy your craftiness!
Cookie Earbud organizers
For directions, I won’t even attempt to explain, because I watched and followed this exact video, and dude does a thorough job explaining.
Besides the fuse bead standards, this craft only requires a hot glue gun… easy!
Ours came out like this…. they were cute and super easy!

Let me know if you decide to try any of these next-level fuse bead projects; I’d love to see what you create!